Tuesday, 30 October 2012

Ogryns from Ogres

Originally published in plamo in 2009 and Warseer in 2010, reproduced with some minor editing here for your reading pleasure : )


Anyone who play the tabletop version of Warhammer 40K [made famous ala Dawn of War] will know about the Imperial Guards..have started this game waaay back when I was in highschool [20+ years lor..so now u know I uncle level one..hehehhe..

why..what's wrong..here alot of uncles one ok?!... = =!!]

Ogryns are basically the 40K versions of ogres, only called abhumans who are not so clever, but nevertheless recruited by the Imperial Guard to fight wars against Chaos [or Xenos ..ala Aliens..the fluff is so thick, novels and novels are written about them..so will not go into 40K literature...

The official ones are metal and costs 11.25 pounds [about S$23] EACH..so a squad of 6 will cost u like $138!!  Update : They cost more now, dont they?

So, in the modelling community, folks who dont wan to blow their noses and their wallet [so they can spend on their children la, dog la, mistress la..oops..u get wat I mean]

Anyone interested can go to their website to learn about it...

Do you want know more?
Games Workshop

Anyway a pic of the box [note box art copyrighted by Gamesworkshop]

First, I need to make ripperguns for the 6 fellas..

[Ripperguns are sturdy, easy to use automatic shotguns so Orgyns can just aim in some general direction - the enemies'..and like the old saying goes..if u keep shooting, maybe you'll hit something...]

 
This is the body of the ripperguns...made from plastic rods and plastic blocks...repeat 6 times later..u either one to shoot yourselves..or just go buy the real deal...]Em112

 
One thing about scratchbuilding and/or kitbashing is your bitzbox [the box where u have spareparts] must be sipeh "bah" [translation : very enough]...
The ammo drums are stolen from a wrecked LVTP..
It has 20+ of the wheels..heh heh..but never fear, the APC is not wasted..it has some other projects...
Included below are some rough plans for anyone interested in scratchbuilding their own ripper guns:


Conversion of the ogre body..
 
Added plasticard as armor plates..in the community it's called "40K-fy"...
 
Backviewof one of them..with ammo pouches added..
 
PAINTING:

The first completed 2 are painted as trial...
The Back view..the one on the right was pale flesh with a flesh wash..the one on the left was layered with dwarf skin tone and highlights AFTER the wash..so the effect is better.. The grenades are scratchbuilded..the red one is Krak and the green one is frag [one got better armor penetration, one got a blast radius but lesser kill effect...go figure..both have it's own use in the tabletop game]

Berets are made from green stuff...spare shotgun shells lined the bandolier are plastic rods with just some gold paint at the lower part of the shell.
 
After painting all of them, these palm-sized dudes are ready to roll into battle..recommend using Vallejo Game Colors as the adhesion is better, so the paint dont wear off too easily [yes..it still WILL chip if yr wife scratch it with her freshly manicured nails....]


Who says only Orks smokes Cigars??

The squad leader [known as the Bonead or Bone head], as he is a little bit smarter [know how to use binoculars]....

"FRAG the fraggers! Now!~"

"Er..boss!!!, is it da red one..or da green one?" [bullets rechocheted on the sides of the wall..going Whoop whoop whoop against the mudwalls and plazinc walls...]

"*%#&^$!!.. DA GREEN ONE!!!!!"

....and his men went ahead and threw the red ones anyway.

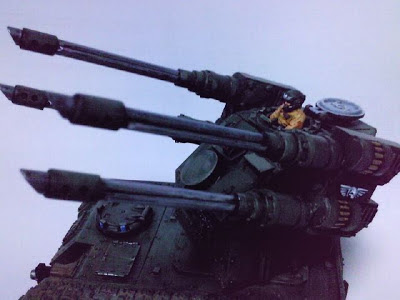
Scratchbuilding a Hydra Flak Tank

This was done a few year back, luckily I managed to rescue most of the pictures from Imageshack!

Here's some of the WIP and completed pics, its very tough because of a lot of repetitive work involved, but the results are satifying as hell!

You'll need a chimera or basilisk kit and....

You need lotsa plastic rods, lots and lots of plastic rods [and placard]:


The radar dish is a magnet button actually!
 
 
The Completed Hydra :

Monday, 29 October 2012

Star Wars Trashbashed Freighter -Painted! PART 3

What began as a junk build :

http://wargamingnut.blogspot.sg/2012/10/star-war-ish-freighter-on-cheap.html

Followed by the WIP:
 http://wargamingnut.blogspot.sg/2012/10/star-wars-ish-freighter-painting-wip.html

Finally done with painting! But who knows, might just add a splash of paint here and there later lol...

Quick paint job, nothing to shout about, what could have been better:

- use putty to cover up the hotglue marks
- more weathering

Thanks for viewing !


 Thanks to the guys at TMP, http://theminiaturespage.com/boards/msg.mv?id=285058
who were able to come up with an assortment of names for this freighter, some were good, some er...LOL

I shall called it, the BANTHA EXPRESS, given the 4 xYakult thrusters looks like the stouty legs of the animal LOL

It is ready to smuggle some deathsticks to the Ewoks on Endor!!

Sunday, 28 October 2012

Star Wars -ish Freighter Painting WIP PART 2

Followed by the build yesterday http://wargamingnut.blogspot.sg/2012/10/star-war-ish-freighter-on-cheap.html

Alright, slapping on some paint and WIP :


Note : The ship has false floorings to smuggle Deathsticks to the Ewoks in Endor.

Some thoughts:

When slapping paint on it, remember to add gradual highlights, and have lighter tones around the edges, in this case, the base color is Vallejo's Neutral Grey, followed by successive mix of Bone White.

Some red stripes were painted, these were purposely painted carelessly to resemble the "used-space effect" or to give the ship a shoddy look.

The cockpit [Yakult bottle]was given a initial gloss coat.

A left over Sergeant Keroro toy sticker was used to stick wordings and decals but they have common numerics! No Aurebesh but oh well....I have a bunch of left over water-slide decals but too bloody lazy to use them..stickers are fast and good LOL.

Pic taken with casting crew [not confirmed yet as there are some more auditions on the line for the upcoming space opera heheheh].

Not finished yet, where's my detail brush...hmmm...

PART 3 HERE

Star War -ish Freighter on the cheap... Scratchbuilt and trashbashing a spaceship PART 1

I am still a big fan of Starwars Miniature Battles after all these years, and after accumulating enough junk, I've finally decided to build one freighter on the cheap. This could be used as a prop, background terrain piece, or simply a possible gaming piece.

First of, some of the important tools used :

The cutter on the bottom has a thick, short blade which is very useful for cutting thick plastic, its better than the orange paper cutter I have next to the scissors. For people who like to trashbash and clobber common household items into their mad modelling fantasies, I could recommend the drill and hotgule gun enough!

Some of the items:

 A cheap water bottle.
Yakult bottles! I used five of them, one was used as the cockpit. The design and paint scheme will more or less mimick/copy the Millenium Falcon:
Of course it will be very different, but I hope the paint scheme will more or less go in that way hehehe...

After hotgluing all the parts together...


The twin lasers are made from an empty dental floss casing and 2 plastic tubes.
Some cards and various junks like contact lens casing, etc are then PVA glued on the body of the ship.

IMPORTANT:
1. When hotguling the parts together, drill a few holes on both sides so the hotglue will flow inside both parts and lock it so the hold is stronger.

2. Use some sandpaper to sand down the surface of the plastic so that paint will stick better before you prime it.


Now onwards to painting !!

Now whats a good name for the ship....

TO BE CONTINUED.....

PART 2 HERE

Sunday, 16 September 2012

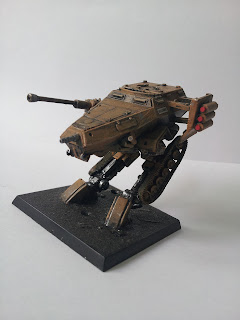
Gear Krieg 1/72 Walker

OK its been awhile, heres a little 1/72 Gear Krieg I've made sometime ago.


Its based on Revell's kit:

I saw off half of the body and added legs to it.
 
The tracks are from FOW bits and the legs from from EM4 some mechs, but I guess you can easily use any pair of left over legs from mech. The reverse joint is good! Some plastic tubes were added for rocket launchers and a cannon was added on the left side, and the body of the cannon is actually a left over ECM pod from some aircraft accessory.
 
The toecap is actually disposable shaver's handles cutted at an angle so it resembles some triangular shaped thingy hee hee...
 
The finished product is quite satisfactory, and I originally have plans to make some more..but many distractions made me shelf this aside [not to mention no one deals with Gear Krieg here, let alone its in 1/72 scale!]


Now except for touching up and adding sand and flock for the base !