Monday 29 October 2012

Star Wars Trashbashed Freighter -Painted! PART 3

What began as a junk build :

http://wargamingnut.blogspot.sg/2012/10/star-war-ish-freighter-on-cheap.html

Followed by the WIP:
 http://wargamingnut.blogspot.sg/2012/10/star-wars-ish-freighter-painting-wip.html

Finally done with painting! But who knows, might just add a splash of paint here and there later lol...

Quick paint job, nothing to shout about, what could have been better:

- use putty to cover up the hotglue marks
- more weathering

Thanks for viewing !


 Thanks to the guys at TMP, http://theminiaturespage.com/boards/msg.mv?id=285058
who were able to come up with an assortment of names for this freighter, some were good, some er...LOL

I shall called it, the BANTHA EXPRESS, given the 4 xYakult thrusters looks like the stouty legs of the animal LOL

It is ready to smuggle some deathsticks to the Ewoks on Endor!!

Sunday 28 October 2012

Star Wars -ish Freighter Painting WIP PART 2

Followed by the build yesterday http://wargamingnut.blogspot.sg/2012/10/star-war-ish-freighter-on-cheap.html

Alright, slapping on some paint and WIP :


Note : The ship has false floorings to smuggle Deathsticks to the Ewoks in Endor.

Some thoughts:

When slapping paint on it, remember to add gradual highlights, and have lighter tones around the edges, in this case, the base color is Vallejo's Neutral Grey, followed by successive mix of Bone White.

Some red stripes were painted, these were purposely painted carelessly to resemble the "used-space effect" or to give the ship a shoddy look.

The cockpit [Yakult bottle]was given a initial gloss coat.

A left over Sergeant Keroro toy sticker was used to stick wordings and decals but they have common numerics! No Aurebesh but oh well....I have a bunch of left over water-slide decals but too bloody lazy to use them..stickers are fast and good LOL.

Pic taken with casting crew [not confirmed yet as there are some more auditions on the line for the upcoming space opera heheheh].

Not finished yet, where's my detail brush...hmmm...

PART 3 HERE

Star War -ish Freighter on the cheap... Scratchbuilt and trashbashing a spaceship PART 1

I am still a big fan of Starwars Miniature Battles after all these years, and after accumulating enough junk, I've finally decided to build one freighter on the cheap. This could be used as a prop, background terrain piece, or simply a possible gaming piece.

First of, some of the important tools used :

The cutter on the bottom has a thick, short blade which is very useful for cutting thick plastic, its better than the orange paper cutter I have next to the scissors. For people who like to trashbash and clobber common household items into their mad modelling fantasies, I could recommend the drill and hotgule gun enough!

Some of the items:

 A cheap water bottle.
Yakult bottles! I used five of them, one was used as the cockpit. The design and paint scheme will more or less mimick/copy the Millenium Falcon:
Of course it will be very different, but I hope the paint scheme will more or less go in that way hehehe...

After hotgluing all the parts together...


The twin lasers are made from an empty dental floss casing and 2 plastic tubes.
Some cards and various junks like contact lens casing, etc are then PVA glued on the body of the ship.

IMPORTANT:
1. When hotguling the parts together, drill a few holes on both sides so the hotglue will flow inside both parts and lock it so the hold is stronger.

2. Use some sandpaper to sand down the surface of the plastic so that paint will stick better before you prime it.


Now onwards to painting !!

Now whats a good name for the ship....

TO BE CONTINUED.....

PART 2 HERE

Sunday 16 September 2012

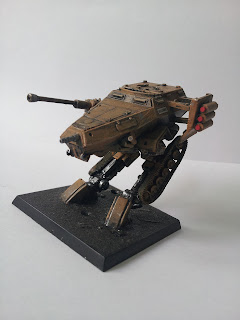
Gear Krieg 1/72 Walker

OK its been awhile, heres a little 1/72 Gear Krieg I've made sometime ago.


Its based on Revell's kit:

I saw off half of the body and added legs to it.
 
The tracks are from FOW bits and the legs from from EM4 some mechs, but I guess you can easily use any pair of left over legs from mech. The reverse joint is good! Some plastic tubes were added for rocket launchers and a cannon was added on the left side, and the body of the cannon is actually a left over ECM pod from some aircraft accessory.
 
The toecap is actually disposable shaver's handles cutted at an angle so it resembles some triangular shaped thingy hee hee...
 
The finished product is quite satisfactory, and I originally have plans to make some more..but many distractions made me shelf this aside [not to mention no one deals with Gear Krieg here, let alone its in 1/72 scale!]


Now except for touching up and adding sand and flock for the base !


Wednesday 28 March 2012

Vampire Count Black Coach

Going to show you how I build my Vampire Count Black Coach.

The wagon is the small house from the Garden of Morr...
The wheels are from Lego! I was dam bloody lucky to have found it selling for lose at a local toy store for like 50 cents each, the cairnwraith is from Reaper miniatures.


I decided to keep the stems at the horses foot and cut slots at the bottom of the base to further secure them and make them stronger.


I wanted to buy the coffin with the vampire bit from ebay but decided the poorhammer in me will make a cheap foam version of it, as its going to be dark and you can't really see it...so...LOL


It's going to be dark inside, so some shape on the coffin is just enough if you can't resist peeping...hee hee...


Chaining up the horses to the wagon is the toughest part as I've pinned it and connect it all the way to the wraith's body to show as if he's holding to it.


The curtain is actually wavy cardboard ! The 2 lamps are bits filed to appropriate size and glued to the side.

Black Coach done!! Now onwards to priming and painting !!

Tuesday 27 March 2012

More Damels and ladies

Hurray, my ebay stuff arrived today!!

They are from Reaper miniatures :

These 2 minis are Hannah Blackruby, Wizard 03329 and Tinley,Female Wizard 03563
both will work as Bretonnian Damsels for my Bretonnian army !

They produce some of the best minis at affordable prices, and the range allow you to mix and match if you are not too bothered about it or going to sanctioned tournaments!

Looking forward to have them painted !~

Meanwhile, my bretonnian army WIP. They are about 40 percent painted and largely still in progress.


My trebuchet and Chimera are amongst it !


Monday 26 March 2012

Defensive Stakes

De Rochefort's article on defensive stakes at the Round Table of Bretonnia is soo cool that I have to have a go at it ! My old edition Bretonnian archers would need them as they dont come with it....so DIY away!


First off, some disposable chopsticks! These are easily availble but some twigs or dowel wood would do just fine! Some chains and some balsa 20mm wide balsa wood strips.

They are cut to appropriate length:


From this point onwards, I used a hotglue gun instead, including making the metal bands connecting to the chains! Its pretty crude compared to De Rochefort's lol..


As hotglue are no known for being v "sticky" or strong in their bond, I smeared it all over the place and interconnect the glue like "roots" to the stakes [see above] so that the contact is stronger.

PAINTING :
  • The whole thing is brush painted with black as primer.
  • The stakes are simply painted with any wood color and the sharp point bonewhite.
  • The metal band and chains are drybrushed with boltgun metal.
The "metal bands" connecting the chains are a bit crude and too thick in the beginning, but after getting used to controlling the flow of the hotglue, I quickly apply thin amounts consistently to more resemble metal rings.


And three more I have four now!  I hotglue some rocks, smear the base with watered down PVA, add sand and its done! Now waiting for the PVA to dry, and apply one more layer to strengthen it.

Oh, in case you wonder, below are the case file of Vallejo paints I have..very great paints!